How To Maintain Your Sourdough Starter

The great thing about a sourdough starter is that it only needs to be developed once. After that, it will require a minimum amount of maintenance to be kept ‘alive’, but it’s absolutely worth the effort!
You’ll be able to create many different sourdough bakes, as often as you like, without the need to create the starter from scratch each time you want to use it in a recipe.
In theory, your starter can be stored indefinitely. And, the longer you keep it—as long as it’s properly maintained—, the stronger it will become. Bakeries usually keep and maintain their starters for many years, even decades. In fact, some claim to use starters that were developed over 100 years ago!
So what do you need to do?
It really depends on how often you’ll bake sourdough. If you are planning to bake several times a week, then it’s probably worth keeping a small amount at room temperature on your kitchen counter. This will require daily maintenance, and there may be some wastage, so the key here is to keep the starter amount to the bare minimum. This way you’ll be able to use your starter anytime you like and also have the opportunity to try and experiment with other recipes that call for a starter or a starter discard (the stuff that you throw away before ‘feeding’ the starter with fresh flour and water).
You can make pancakes, waffles, crackers, the list goes on and on. Check our sourdough brownies recipe here! And, to minimise waste, you can always give some of your starter to friends and family. Remember that the starter can be used not only in the making of a loaf of bread, but also in focaccias and other raised breads. More recipes coming soon!
If, on the other hand, you only want to bake once a week (perhaps every weekend, or less often), then it is best to store your starter in the fridge. A low temperature will slow down the fermentation process, which means you will only need to feed your starter about once a week or so. This way you’ll also save some flour and you won’t have to worry about the daily maintenance! One word of caution though: with the weekly feeding routine, your starter won’t be ready to be used straight away. You’ll need to allow a couple of feedings to make your starter fully active again, before it can be used in your sourdough recipe.
See the full process below, for both options.
Storing at room temperature—Daily Maintenance
The process is simple—the main thing is consistency. And when we say consistency, we mean consistent timings, temperature and measurements.
To keep the starter at room temperature, you need to feed it every day. Some people feed it 3 times a day, some do it once, it really depends on your preference and how this process fits best into your daily routine.
The maintenance steps described below are for feeding twice a day. Once you get used to the process, you should be able to adjust this recipe to suit your needs. It will require some practice, so we’d suggest you stick to this routine for a month or so, see how this works for you, observe your starter and, once you feel more confident about the process, adjust it to serve your requirements.
The starter needs to be fed when it’s just fully active and ripe—that is when it’s at the highest point in the rise and it’s just about to start deflating/collapsing again. The time needed for the starter to rise will mainly depend on the ratio of fresh flour and water that you feed your starter with. If you use the ratio 1:1:1 (starter:flour:water), you will need to feed it more often than when the ratio is, say, 1:5:5. This is because in the second scenario you are feeding your starter with five times more fresh flour to the amount of starter (1:5 ratio), so it will take more time for the starter to ‘eat up’ the fresh ingredients.
Most bakers that use the 1:1:1 ratio will feed their starter about 3 times a day. We tend to use the 1:4:4 ratio, which means we can extend the period between feedings, and only need to feed it twice a day.
To illustrate the ratio 1:4:4, here is the formula:
5g starter (1 portion)
20g flour (4 portions) [5g x 4 = 20g]
20g water (4 portions) [5g x 4 = 20g]
As we mentioned before, to minimise waste, it is good practice to keep a very small quantity of the starter (45g) at any point and discard all but 5g at each feeding time.
The type of flour used will also have an impact on how long the starter will need to reach the peak—for example, white flour typically peaks faster than wholemeal/whole wheat flour.
The temperature in your kitchen could also impact the timings—you may notice quite a big difference between summer and winter months.
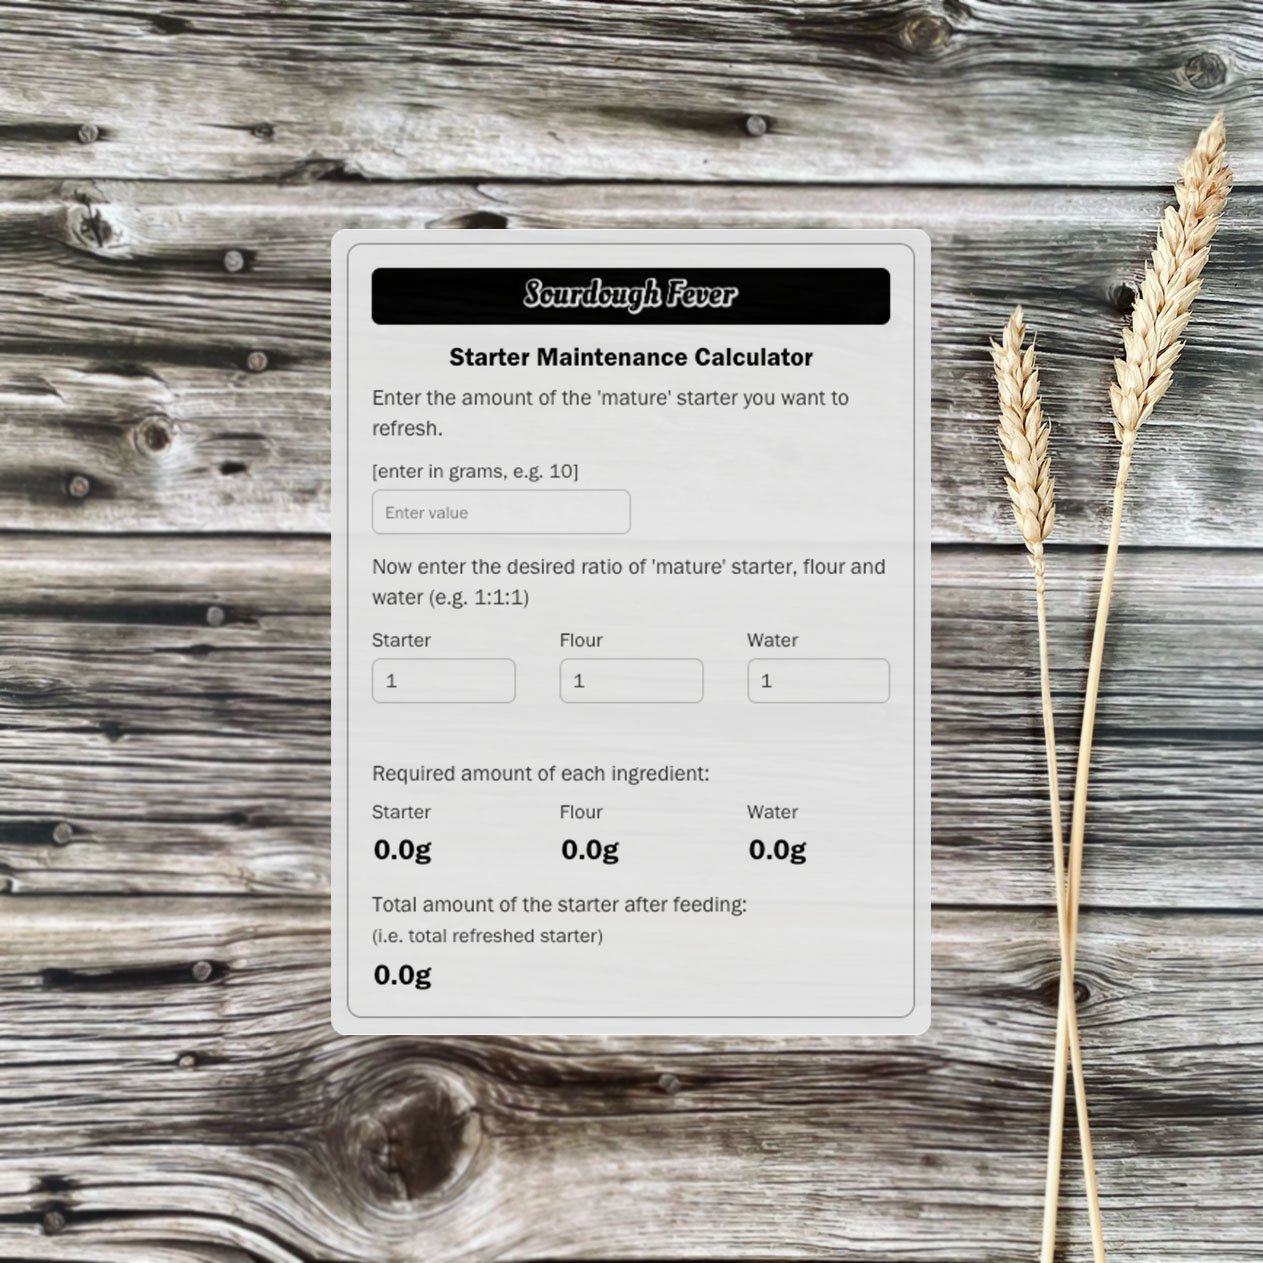
Get access to our Starter Maintenance Calculator
Daily feeding process
Day 1 (8am)
Take a clean jar and transfer 5g of your starter to the jar and discard the rest. Add 20g of water (27°C/80°F) and mix until combined. Then add 20g of strong wholemeal/whole wheat flour and mix again until fully incorporated.
Loosely cover with the lid and leave it at room temperature. We usually place the starter on the countertop—just make sure your jar is away from any direct sunlight, ideally in a warm area of your kitchen. You can place a rubber band around the jar, to mark the level of the starter. A fully active starter should at least double in size at its peak.
We like to use strong wholemeal/whole wheat flour in our starter, but you can also use rye or strong white bread flour—or a combination of both. Each flour will produce a slightly different flavour, texture and consistency on the starter. And, as mentioned above, the time required to peak may vary.
As previously mentioned, the water temperature and the temperature of your kitchen will also affect how fast your starter will become fully active. Your starter will be happiest in a warm environment, ideally 26°C (79°F). If your kitchen is warmer, the starter might be ready sooner, which means you may have to feed it earlier than the time described here. You can slightly adjust the feeding ratio to extend the time required to peak, or you can use cooler water when feeding, to compensate. If your kitchen is colder, you may use warmer water when feeding or place the starter in the oven with just the light on to keep it warm. You can also invest in a proofer. We recommend Sourdough Home from Brod & Taylor or Folding Proofer that can also be used to keep your dough warm during bulk fermentation.
Day 1 (8pm)
12 hours after last feeding, your starter should at least double in size, have a sweet smell and be very bubbly. If you haven’t achieved that at this point, leave it for a little longer. You may have to adjust your timings or temperature, or lower the ratio of starter/flour/water to make sure you feed at the right time. If your starter is already collapsing at this point, that is OK—just make sure you feed it as soon as possible. If it has collapsed completely back to the starting point, you waited too long. This means you may have to change (increase) the ratio of starter/flour/water or feed three times a day instead of two.
Take a clean jar and transfer 5g of your starter to the jar and discard the rest. Add 20g of water (27°C/80°F) and mix until combined. Then add 20g of strong wholemeal/whole wheat flour and mix again until fully incorporated.
Leave it at room temperature for 12 hours and then repeat the process again.
If you forget to feed your starter for one of the feedings, don’t panic, just feed it as soon as you realise and then follow the routine again.
Storing in the fridge
If you won’t be baking sourdough more than once a week, or you’re going away for a while, it is best to store your starter in the fridge. The low temperature will slow down the fermentation process so you won’t have to look after your starter on a daily basis. You can keep your starter in the fridge for up to a couple of weeks without feeding, but you’ll need to take it out of the fridge at least a couple of days before you bake your bread and follow the daily routine outlined above. Before you feed again, make sure your starter is at room temperature—don’t feed it cold. And even if you are not planning to bake bread, try to feed your starter once a week or at least every fortnight. Take it out of the fridge, let it come to room temperature, follow one feeding process: discard all but 5g, add 20g of water and 20g of flour, leave it at room temperature until fully active and place it back in the fridge.
Starters stored in the fridge will often darken in colour over time. You may also notice a layer of liquid developing at the top—you can either stir it back into the mixture or discard it before the next feeding.
If your starter gets mouldy, discard it completely and develop a new starter from scratch.

Q&A
When is my starter ready to use?
The starter has to at least double in size in the 12 hours between feedings (following the 1:4:4 ratio).
You can also try the flow test, but this is not always an accurate measure. Take a spoon of starter and drop it in a cup of tepid water. If the starter floats, it is ready to use.
How to tell my starter is at peak?
The starter is at its peak when it forms a slight dome on top, and you should observe some bubbles at the surface. When the dome starts to fall and the starter begins to deflate, it has passed its peak. You can typically use your starter about 1-2 hours after it has reached its peak.
When to discard your starter?
If you forget about your starter for several weeks while it is in the fridge and it shows visible signs of mould—or it develops a pink or orange colour—throw it away. Equally, if the smell is not the usual sweet or acidic aroma, and it is quite unpleasant, throw it away.
Why discard so much of the starter?
For best results, your starter needs to be fed, at the very least, using the 1:1:1 ratio (starter:flour:water). This means that the amounts will quickly become very large, if some of it is not discarded. Imagine that you have 100g of starter—if you don’t discard anything, in your next feeding you will need to add at least 100g flour and 100g water, which will give you a fresh starter of 300g. This will quickly grow to 900g and so on. So keep it to the minimum.
Instead of discarding your starter, you can store all or some of the ‘discard’ in a separate container in the fridge. It may be kept unfed for about a week and can be used in a recipe that calls for a discard, such as our delicious brownies recipe. Sorted!
How to increase the amount of the starter?
If your recipe calls for a quantity of starter that is bigger than 45g, you can feed it without discarding anything until you achieve the amount you need. Just remember to feed to the same ratio of flour and water. If you decide to feed using the 1:1:1 ratio, then you will need 45g of flour and 45g of water and keep all the starter you already have (45g). This will give you a new starter that is 135g. If you need more, you can use a higher ratio, for example: 1:2:2, which will be 45g starter : 90g flour : 90g water.
Get access to our Levain Building Calculator
What if I forgot to feed my starter?
If you keep your starter at room temperature and you forget to feed it once or twice, you should be able to revive it. Just follow the routine as soon as you remember. It would be best not to use it in baking for at least a couple of days, or until the starter is fully active again.
If you forgot the starter in the fridge, as long as it doesn’t smell very bad and is not moldy, you should be able to revive it. Just feed again at the next opportunity—if it starts bubbling after a couple of hours, it means the starter is still ‘alive’. Follow the feeding for at least a couple of times at room temperature to make sure the starter is fully active, before you use it or place it back in the fridge.
Storage container
We use a small glass jar to store the starter, with straight walls, and a lid that can be loosely placed on top of the jar. You will need some air flow for your starter to ‘breathe’, so never fully seal it. If you follow our recipe, your jar shouldn't be bigger than 300ml. This will allow plenty of room for your starter to rise 2, 3 or even 4 times the starting volume. You can use a rubber band around the jar, to mark the starting point and to observe how much the starter increases in volume over the 12 hours period.
You should change the container with each feeding, so it’s best to keep around two or three identical jars to allow for fresh daily replacements.
NEXT STEP:
Check our Starter Maintenance and Levain Building calculators to help you with the math.
Starter Maintenance Calculator will work out how much mature starter, flour and water to use based on your required ratio of the three ingredients. Our Levain Building Calculator will be useful when building your levain (or starter) to the amount required in your recipe.
Get access to the calculators.
Check our NEW Sourdough Fever Stencils!